E
Eric Hansen
Guest
For a long time its been stated that to secure your Linux machine you should change the default port number of services such as SSH and your favorite web server. While this is still a good step to take if you’re overly paranoid (or tired of port scanning alerts…), there’s got to be better ways to do this, right? Well, you would be correct! Here we will secure SSH with Google Authenticator to create a two-factor authentication method.
What Is Needed
I’ll be doing this on an Ubuntu system, if you’re not then please make the appropriate adjustments. We’ll be also starting from scratch and right now you should be able to SSH to the server (if not please make sure you can if you’re going to be following along).
I’ll be doing this as root because it’ll be needed later on and the machine is segregated from the Internet. Keep this mind if you’re not jumping right into root (which isn’t really advisable anyways, I’m doing it for sake of ease).
Lastly, you need the Google Authenticator app installed on your phone. Its available for Android and iPhone for sure, check your software store for availability.
Installing the Necessities
Before we make the magic happen we’ll need to be installing some software. Here’s a list of what’s needed on Ubuntu 13.04:
We need to install build-essential because we’ll be compiling the authenticator from source (its available in the package manager but is missing PAM support). make is used to do the compiling, linking and installing. Since we’re making a PAM module we need the development libraries (libpam0g-dev) and I prefer to include the regular library as well just for safe measure. Sometimes it's needed, others not.
After that we’ll cd to /usr/local/src and get to the grunt work:
Modifying the Source
This is the reason why we downloaded and are compiling from source: we need PAM support. Ironically, it might work for some systems, but for Ubuntu we need to specify linking to the PAM module. While this isn’t difficult it is needed. Open up the “Makefile” file in your favorite editor and above the line “VERSION := 1.0” put the following:
Now save and exit.
Compiling and Installing
Now, typically compiling the source is slightly more in-depth than this but thankfully Google made it super easy! Run make:
The important thing to make note of is the last few lines where it has “-lpam”, which states that the PAM library is being compiling with it, thus making it PAM module usable. Next, we need to install it, which is just as easy:
Set Up Google Authenticator
Before we go into configuring SSH lets first set up Google Authenticator. Simply run the “google-authenticator” program as the user you wish to log in with via SSH. You’ll be prompted with a few questions.
Tokens can either be time-based or one-time used. Time-based is the more secure method in that it changes every 30 seconds, whereas one-time means that the token doesn’t change until its been used. For various reasons we’ll be using time-based tokens.
Expanding on what was just said, basically once the token is used by the user it won’t allow you to use it again. Given there is roughly 10^6 = 1,000,000 possibilities, I think its a safe bet we don’t have to worry about issues if we want to be a bit more secure. Fun fact: while the last sentence doesn’t directly have a relation to this, its still fun to point out and address just how secure we are in that there’s a 1 in 1,000,000 (0.000001%) chance that the same token will be chosen in a 30 second window.
I chose no, but since we are using time-based tokens it might be beneficial to enable. Side note if you wish to change this in the future edit ~/.google_authenticator and add the following line just above “DISALLOW_REUSE”:
I don’t know how to edit the variable to change it, but that is the difference between enabling and disabling that option.
I enabled, because I know how tricky and persistent “hackers” can be.
Now, you’ll notice before the questions were asked you got something like this:
Copy and paste the URL into your browser and scan the QR code that pops up (please use your own specific URL as mine won’t work for you). If you can’t scan the barcode then you can enter the information manually with the secret key and verification code.
Configure PAM
Next few steps are going to be quick and easy, so lets first set up SSH’s PAM. Edit the file /etc/pam.d/sshd and add the following line to the end:
This states that in order for authentication to succeed the user must have Google Authenticator tied to their account. Keep this in mind for later.
Configure SSH
Another quick edit, open up /etc/ssh/sshd_config and edit this line:
Change the “no” to “yes”. This enables use of PAM modules for authentication purposes.
Now restart SSH:
Testing
Lets test a user who we didn’t set Google Authenticator up with. Lets say this user’s name is “bob”:
Replace “localhost” with the hostname or IP of the server you installed Google Authenticator and SSH to. If you notice, I typed in the user’s password (masked, but I did) and it bounced back wanting the password again. That’s because of that “required” line we put into the /etc/pam.d/ssh file.
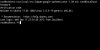
Now, since I set this up with root we’ll try to log in as root:
It asked me for the password and the token (“verification code”) in the app on my phone, then it verified me and logged me in. I ran the “who” command to show I was logged in via SSH (the last line).
What Is Needed
I’ll be doing this on an Ubuntu system, if you’re not then please make the appropriate adjustments. We’ll be also starting from scratch and right now you should be able to SSH to the server (if not please make sure you can if you’re going to be following along).
I’ll be doing this as root because it’ll be needed later on and the machine is segregated from the Internet. Keep this mind if you’re not jumping right into root (which isn’t really advisable anyways, I’m doing it for sake of ease).
Lastly, you need the Google Authenticator app installed on your phone. Its available for Android and iPhone for sure, check your software store for availability.
Installing the Necessities
Before we make the magic happen we’ll need to be installing some software. Here’s a list of what’s needed on Ubuntu 13.04:
Code:
root@sshtest:/usr/local/src# apt-get install build-essential make libpam0g-dev libpam0gAfter that we’ll cd to /usr/local/src and get to the grunt work:
Code:
root@sshtest:/usr/local/src# cd /usr/local/src
root@sshtest:/usr/local/src# wget https://google-authenticator.googlecode.com/files/libpam-google-authenticator-1.0-source.tar.bz2 -O googleauth.tar.bz2
root@sshtest:/usr/local/src# tar -xf googleauth.tar.bz2 && rm googleauth.tar.bz2
root@sshtest:/usr/local/src# cd libpam-google-authenticator-1.0/This is the reason why we downloaded and are compiling from source: we need PAM support. Ironically, it might work for some systems, but for Ubuntu we need to specify linking to the PAM module. While this isn’t difficult it is needed. Open up the “Makefile” file in your favorite editor and above the line “VERSION := 1.0” put the following:
Code:
LDFLAGS="-lpam"Compiling and Installing
Now, typically compiling the source is slightly more in-depth than this but thankfully Google made it super easy! Run make:
Code:
root@sshtest:/usr/local/src/libpam-google-authenticator-1.0# make
gcc --std=gnu99 -Wall -O2 -g -fPIC -c  -fvisibility=hidden  -o google-authenticator.o google-authenticator.c
gcc --std=gnu99 -Wall -O2 -g -fPIC -c  -fvisibility=hidden  -o base32.o base32.c
gcc --std=gnu99 -Wall -O2 -g -fPIC -c  -fvisibility=hidden  -o hmac.o hmac.c
gcc --std=gnu99 -Wall -O2 -g -fPIC -c  -fvisibility=hidden  -o sha1.o sha1.c
gcc -g  "-lpam" -o google-authenticator google-authenticator.o base32.o hmac.o sha1.o  -ldl
gcc --std=gnu99 -Wall -O2 -g -fPIC -c  -fvisibility=hidden  -o pam_google_authenticator.o pam_google_authenticator.c
gcc -shared -g  "-lpam" -o pam_google_authenticator.so pam_google_authenticator.o base32.o hmac.o sha1.o -lpam
gcc --std=gnu99 -Wall -O2 -g -fPIC -c  -fvisibility=hidden  -o demo.o demo.c
gcc -DDEMO --std=gnu99 -Wall -O2 -g -fPIC -c  -fvisibility=hidden  -o pam_google_authenticator_demo.o pam_google_authenticator.c
gcc -g  "-lpam" -rdynamic -o demo demo.o pam_google_authenticator_demo.o base32.o hmac.o sha1.o  -ldl
gcc -DTESTING --std=gnu99 -Wall -O2 -g -fPIC -c  -fvisibility=hidden  \
-o pam_google_authenticator_testing.o pam_google_authenticator.c
gcc -shared -g  "-lpam" -o pam_google_authenticator_testing.so pam_google_authenticator_testing.o base32.o hmac.o sha1.o -lpam
gcc --std=gnu99 -Wall -O2 -g -fPIC -c  -fvisibility=hidden  -o pam_google_authenticator_unittest.o pam_google_authenticator_unittest.c
gcc -g  "-lpam" -rdynamic -o pam_google_authenticator_unittest pam_google_authenticator_unittest.o base32.o hmac.o sha1.o -lc  -ldl
Code:
root@sshtest:/usr/local/src/libpam-google-authenticator-1.0# make installBefore we go into configuring SSH lets first set up Google Authenticator. Simply run the “google-authenticator” program as the user you wish to log in with via SSH. You’ll be prompted with a few questions.
Code:
Do you want authentication tokens to be time-based (y/n)
Code:
Do you want to disallow multiple uses of the same authentication
token? This restricts you to one login about every 30s, but it increases
your chances to notice or even prevent man-in-the-middle attacks (y/n)
Code:
By default, tokens are good for 30 seconds and in order to compensate for
possible time-skew between the client and the server, we allow an extra
token before and after the current time. If you experience problems with poor
time synchronization, you can increase the window from its default
size of 1:30min to about 4min. Do you want to do so (y/n)
Code:
" WINDOW_SIZE 17
Code:
If the computer that you are logging into isn't hardened against brute-force
login attempts, you can enable rate-limiting for the authentication module.
By default, this limits attackers to no more than 3 login attempts every 30s.
Do you want to enable rate-limiting (y/n)Now, you’ll notice before the questions were asked you got something like this:
Code:
https://www.google.com/chart?chs=200x200&chld=M|0&cht=qr&chl=otpauth://totp/root@sshtest%3Fsecret%3D3AKID...GJTP
Your new secret key is: 3AKID...GJTP
Your verification code is 46...73
Your emergency scratch codes are:
<snipped numbers>Configure PAM
Next few steps are going to be quick and easy, so lets first set up SSH’s PAM. Edit the file /etc/pam.d/sshd and add the following line to the end:
Code:
auth required pam_google_authenticator.soConfigure SSH
Another quick edit, open up /etc/ssh/sshd_config and edit this line:
Code:
ChallengeResponseAuthentication noNow restart SSH:
Code:
service ssh restartLets test a user who we didn’t set Google Authenticator up with. Lets say this user’s name is “bob”:
Code:
root@sshtest:/usr/local/src/libpam-google-authenticator-1.0# ssh bob@localhost
Password:
Password:Now, since I set this up with root we’ll try to log in as root:
Code:
root@sshtest:/usr/local/src/libpam-google-authenticator-1.0# ssh root@localhost
Password:
Verification code:

Welcome to Ubuntu 13.04 (GNU/Linux 3.8.0-19-generic x86_64)

* Documentation:  https://help.ubuntu.com/

Last login: Wed Sep 11 23:55:22 2013 from localhost
root@sshtest:~# who
ubuntu  lxc/tty1  2013-09-11 22:49
root  pts/0  2013-09-11 23:58 (localhost)
root@sshtest:~#